We have been in our home for 6 months and our family room has always been so boring, so it was just time to do something with this huge room with it's vaulted walls! I did my research and thought about what to do with this room for weeks! I got advise from my mom and designer friends which helped a ton to bounce ideas around. I started out with a color scheme, and started with fabric for drapes.
I decided to paint the walls a restoration hardware color called silver sage which is where I started. I found some awesome fabric from Joanns for the drapes which I fell in love with {the green/white fabric above}
I painted the tall vaulted walls with our friends little giant ladder which was super scary! Regan held the bottom of the latter while I went to the very top to trim the corners of the wall. The painting took a while, but not compared to the construction part.
I was very lucky to have found an awesome rug at rugsusa.com during their 70% off Presidents day sale! I got a 9x11 foot rug for $299! My awesome friend Manon helped me find an awesome rug, fabric and chair. I sent her SO many pictures from my research and she helped me a ton!
Here is the before picture-On the left is the paint sample I was deciding on, and Regan moved the tv from the left side of the room to the middle which Manon told me was an essential thing to do to make the room look even.
This dark brown wall bugged me so much every since we moved in, so I was happy to paint over it!
I switched out Black and White Damask drapes in the dining room for these awesome drapes from World Market. My friend Tamara helped me with my research for our home makeover and suggested these drapes and sent me ideas of what to do with the dining room pillars.
I painted the silver sage color in the stairway and painted the staircase railing which was an ugly oak wood color.

This is what the room looked like with the oak railing.
Regan painted the upper level's railing which was awesome since it saved me hours and hours!
I penciled in this design on one of the walls which took forever, then started filling in the lines with paint...
Then I painted the laundry room-started out a gross green color and I painted it mint condition, moved the washer and dryer and created room for a shoe storage bench. Now it doubles as a laundry room and mud room.
So the next pictures are the construction phase of our makeover. We hired a lady who goes to our church to come over and teach me how to cut wood, make waynes coating, and pretty much how to be a handy lady! Cindy came over and showed me how to use a saw, how to measure, use liquid nails and caulk and after a day of being her apprentice, I felt like I was a master carpenter! We started out with the family room wanes coating, and once she left, the hard work continued with caulking, sanding, puttying, sanding more and painting many coats on the wood and walls!
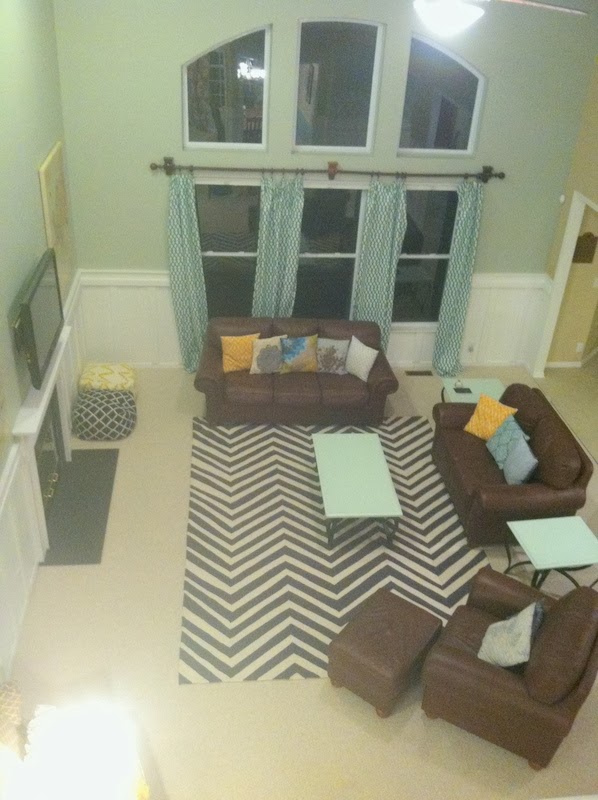
So here is the family room with the new rug, drapes I sewed, new pouf pillows for the kids to sit on, some new pillows, newly painted tables and wanes coating. So happy!!
Then my prints arrived from Ballard Design and I was even more happy! I read an article about how you should have something significant to you and your family for your walls, and to not put something up just for the sake of putting it up. I found these vintage canvas maps and fell in love since we love to travel and since Regan grew up in Africa.
I searched and searched for the perfect chair and lamp, and finally found this chair at Pier One and lamp at a local furniture store. My friend Manon once again saved me when she drew a plan out of how the room should look and a curved lamp was in the plans. I love it!

Regan didn't have too many things to say about the family room make over, but one thing he was very opinionated about is having a good curtain rod, so we got this one at bed bath and beyond...very sturdy if you ask me!
I am in LOVE with this new Family room! The waynes coating just makes it look so elegant and the decorations makes it look so current and up to date!
LOVE!
Phase 2 was wanes coating the entry way and covering the ugly, naked looking pillars. I have to match the paint to the previous paint, but other than that it looks AWESOME! Did I mention a huge motivation for me to do this huge project is because the whole house was painted with flat paint which does not wipe off kids finger prints-when you have 4 young kids, that is a no go! I needed a washable paint to make the walls look clean! Eggshell and satin did that very thing!
Here is the wall I still need to finish stenciling, but it looks SO good with the wanes coating!
Cindy did the pillars and it looks amazing! Regan really did not like the empty pillars, but I didn't mind them, but after seeing the difference, I LOVE them!
Who knows, I might have found my inner carpenter and our whole house might be trimmed out before you know it! Not any time soon though, because I am so projected out! So tired of not being a good mom when I am too busy, and having my house be so messy since I don't have time to clean it while doing projects!


Amazing. I love it all!
ReplyDeleteDIDI, this is incredible! I am so proud of you using a saw, getting up on a ladder..you go girl. Yes, I just said that. Looks awesome.
ReplyDeleteI LOVE it all! The colors are beautiful and so calming. We recently did wainscoting in our entry and it is amazing the difference it makes to add some interest to the wall and to know you created it! Great job! Can't wait to see the finished stencil wall, you are brave!
ReplyDeleteAndrea ... Seriously this looks amazing. I've been toying with the idea of doing this in our half bathroom. Did you use like plywood for the inside area of the wainscoting? I've seen it done both ways, but with how they texturized our walls, I think I need to put some kind of wood in front of it.
ReplyDelete